Let's decompose the OBJ file of the avatar which Linden offers by ObjCut, and make the following shoes by SHIBORI.

Please check about SHIBORI by the following web pege.
http://kanae.net/secondlife/shibori.html
You can download from this web page.
The step which makes shoes is as follows.
1) Download the OBJ file of an avatar from the homepage of Linden.
2) Start only the required portion of an avatar by ObjCut.
3) Read the OBJ file started by SHIBORI.
4) Set up the range which I apply to a sculpted prim.
5) Carry out ShrinkWrap and save at an OBJ file (I save by SHIBORI at a TGA file, and upload is also possible).
6) Tune finely by TATARA and change into a TGA file.
7) Upload to in-world
Let's download the OBJ file of an avatar from Second Life Wiki.
The file is in https://wiki.secondlife.com/wiki/Creation_Portal.

Please click the link underlined in red, and you will get the avatar_mesh.zip file.

Unzip it, you get an OBJ file.
Decompose the OBJ file of the got avatar by ObjCut.
Why should the OBJ file of an avatar be decomposed?
If you shrinkwrap of the portion of a leg by SHIBORI, without decomposing an avatar, both legs will be wrapped as follows.

Therefore, it is necessary to take out only one leg from an OBJ file.
ObjCut was a tool which decomposes the OBJ file of an avatar per texture in order to make a texture from SOMATO. But it was updated.
ObjCut can decompose an OBJ file for every group, or extracts the selected group and can output it as one OBJ file.
Please check by the following detailed web page.
http://kanae.net/secondlife/ObjCut.html
Boot ObjCut and change a setup. Check the desktop on "The folder which saves the divided file" group. And check Group Option of a "divided by" group.

And close ObjCut.
Let's use SL_Female.obj among the OBJ files of the downloaded avatar. Drop this file with the icon of ObjCut.

Then, the list of the groups in this OBJ file is displayed in a dialog.
Check TextureGroup Lo_rFoot and TextureGroup Lo_rShin which are the groups of a right leg, and push the OK button.

Then, SL_Female_Selected.obj is outputted to a desktop.

If you choose and extract a group from an OBJ file by ObjeCut, "_Selected" will be automatically added to a file name. A file is overwritten when there is already the file. Therefore, rename to a suitable name immediately.
Drop the OBJ file outputted by ObjeCut with SHIBORI.

Then, SHIBORI starts and an OBJ file is read automatically.

The OBJ file which is the target of ShrinkWrap is called a "target" by SHIBORI.
Rotate it, because the leg of the target lies. As shown in a figure, if the slider of RotX of a Target group tab is set to 90, a leg will rotate.

Choose the type of the sculpted prim created by carrying out ShrinkWrap of it.
The object outputted by ShrinkWrap is called the lap object by SHIBORI. SHIBORI can carry out ShrinkWrap to three types, Sphere, Drum, and Cylinder.
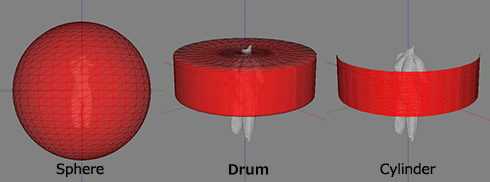
Each type has three kinds (32x32 64x16 16x64) of aspect ratios.
Because shoes are the forms which the upper and lower sides closed, choose 64x16 of Drum.

Specify the range which moves and carries out the lap of the black triangle beside a preview.
Refer to the image of the following soles and specify it.

And you can adjust the position of a target object and can change the position of the center whose lap object cringes.
You can rotate a target object or can do horizontal displacement.

Push the wrap button, if you adjust the position of a target object.

Then, it is as follows.

If shrunk without your specifying a gap, it will become the form which adhered to the target object exactly as follows.
Increase Gap from 0.

Then, it becomes shoes with a target object and a gap.

The gap can specify plus and minus.

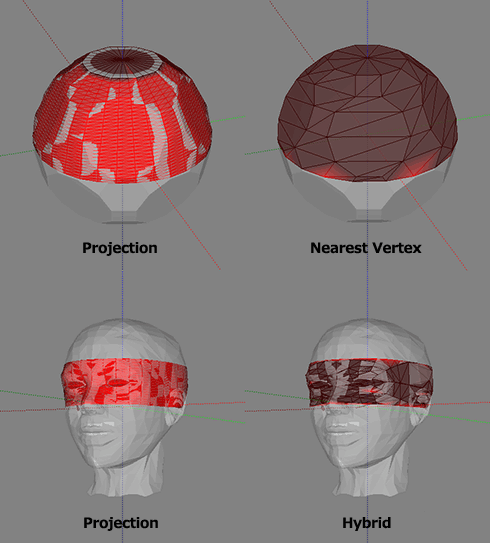
You can choose the method of a lap from the following three kinds.
Projection:
It can do a smooth form.
It can be easily edited by TATARA.
Nearest Vertex:
As for it, an angle is expressed correctly.
Hybrid:
It is the procedure which combined Projection and Nearest Vertex.
Save and carry out a lap file. You can save by Save on the File menu.
SHIBORI can save a lap file at the OBJ file and the TGA file. The TGA file is a sculpt-map file.

Because an OBJ file can be saved by resolution higher than a TGA file, it is fit for modifying the outputted file further.

A TGA file is maximized automatically and saved. It is fit for carrying out in world upload as it is.

Let's save by an OBJ file by SHIBORI, edit a little it by TATARA, and upload to an in world.
Edit in Tsuchi mode like the above-mentioned screen at TATARA.
In order to smooth, it is good to choose Smooth on the Edit menu.
The preservation size of a TGA file is set as 64x64, and Copy Protect by tansparent is specified by TATARA.
When uploading a file to a second life, Please use Upload Image on File menu.

And please check Use Lossless compression in the upload dialog box.
That you created this time does not need to make and upload a left leg, though it is a right leg.
The shoes for left legs will be made if the mirror in an object tab is checked.

Shoes were completed now.
You will find that the texture is turned over if you look at the mesh of a left leg.
http://rokuro.slmame.com/c49773.html
This article is automatically translated by the computer interpreter.
Please notify me of any mistakes in translation.


