Let's make the following boat.

This boat can be tending to make the texture of a bow.
I prepared two background images for making a boat.
The boat seen from the top
The boat seen from the side
The step which makes a boat is as follows.
1) Choose 32x32 of Cylinder.
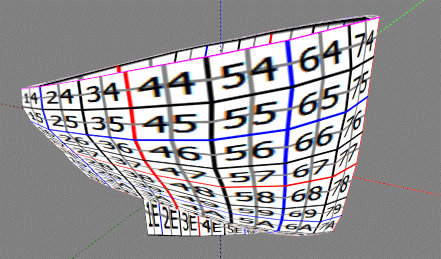
2) Make the form seen from the top by TOKOROTEN mode.
3) Make the form seen from the side by MAGE mode.
4) Close a part with the upper and lower sides open in WAPPA mode, and make a skeg.
5) Lock the part made from Step 4).
6) Make the form seen from before in TSUCHI mode.
Let's make a boat.
Choose New - Cylinder - 32x32 on the File menu.

In order to keep a smooth form, set Grid on the View menu to None.

In order to make a rough form, set Level Of Detail on the View menu to Middle.

Choose a TOKOROTEN tab.

Choose Load Background Image on the View menu, and read the image of the boat seen from the top.

The image of the boat seen from the top
Then, it is read as follows. An image is resized automatically.

Move the control points, as shown in the following figures.

Let's arrange the control points of the bow and the stern as correctly as possible.
Carry out the mirror of the remaining half. According to the following figures, the face which constitutes a section consists of lines of blue and red.

Choose Mirror 80-GG from 00-7G on the Edit menu.

Click the ZX button of the dialog displayed.

And the remaining half has been arranged.

Let's make the side of a boat in MAGE mode.
Click a MAGE tab.

Let's use the image of the side of the following boat as a background image.
The part of the deep color in the bottom is a thin board called a skeg.
Choose Load Background on the View menu and read a background image.

Then, it is displayed as follows.

Let's make a skeg.
Arrange the control points as follows.

Arrange the control points as follows.

Let's arrange the control points of two area of the following red circles in piles.

Choose the control points to arrange in piles by range specification. And right-click an edit display and choose Magnet on a pop up menu.

Let's make the bottom of a boat.
Arrange the control points as follows.

Arrange the control points as follows.

Next, let's make the bottom inside a boat.
Arrange the control points as follows.

Arrange to put the control points on the control points moved at the front step.

Choose the control points to pile up by range specification.
And right-click an edit display and choose Magnet on a pop up menu.
It is the same step as the time of making a skeg.
Arrangement of these control points flattens the bottom inside a boat. If you do not want to flatten the inner side of a boat, please arrange the control points more highly than the position specified by the above-mentioned image.


Let's make the inner side of a boat.
Arrange the control points as follows.

Arrange the control points as follows.

Let's make the outside of a boat.
Arrange the control points as follows.

Let's arrange so that the outside of the stern of a boat may become at equal intervals.
Choose the control points by range specification as follows.

Right-click an edit display and choose Equal Intervals on a pop up menu.
You may press Ctrl+D of the shortcut key.

Then, the control points of the outside of the stern of a boat is located in a line at equal intervals as follows.

Let's make the outside of the bow of a boat.
Arrange the control points as follows.

A preview is displayed as follows.

Please adjust arrangement of the control points, looking at the form of a preview.
Let's close a part with the upper and lower sides open in WAPPA mode.
And let's make the form of a skeg.
Click a WAPPA tab.

Let's make the form of a lower skeg and close the open part.
In order to limit the section to edit, choose Select None on the Sides menu.

It is in the lower left of an edit pane. Click the ">" button, display the section of E0, E1, F0, F1, and G0, and click a central button.

Where the section of G0 is displayed, choose an upper half, as shown in the following figures, and drag the control point of an upper center downward.

Then, it becomes the following forms.

Choose a lower half, as shown in the following figures, and drag the control point of a lower center upwards.

Then, it becomes the following forms.

A preview is as follows. The bottom has still opened.

Check that the present display section is G0.
Once again, choose Select None on the Sides menu.

As shown in the following figures, choose all the control points.

Right-click an edit display and choose Horizontal Align on a pop up menu.
You may press Ctrl+W of the shortcut key.

Then, the control points of the bottom was put together.

Next, let's close an inside bottom.
The preview is displayed as follows.

Click the ">" button in the lower left of an edit pane, and set a section to 00.

Choose all the control points currently displayed as shown in the following figures.

Choose Horizontal Align on the pop up menu which right-clicks an edit display and is displayed.

You may press Ctrl+W of the shortcut key.
Then, the bottom of the boat was made as shown in the following figures.
Let's make the form where the boat was seen from before.
Let's lock so that the forms of the skeg and the bottom may not be transformed.
Choose a Bitmap tab.

Choose the area (00-G0 and 0 E-GG) shown in yellow.

Choose Lock/Unlock - Lock on the Edit menu.

You may press Ctrl+L of the shortcut key.
Click a TSUCHI tab.

Click the YZ button in the lower left of an edit pane.

You see the bottom of a boat have become like a tub.
Choose the part which modifies as shown in the following figures, and drag the control point of the lower left, pressing the Ctrl key.

Let's make the left and the right into the same form.
Choose Lock /Unlock - Unlock All on the Edit menu, and cancel the locked control points.

Check that the face which serves as the mirror by preview consists of lines of blue and red.

Choose Mirror 80-GG from 00-7G on the Edit menu.

Click the ZX button in the displayed dialog.

An edit display becomes as it is shown in the following figures.

In order to make a sculpted prim into the maximum, choose Maximize on the Edit menu.

A preview is displayed as follows.
Let's check the setup of preservation.
Choose Setup on the File menu.

-Set TGA Save Size to 64x64.
-Check Copy Protection by transparent.
-Check by the coordinate system of Second Life. (If this is checked, the script of a boat will be able to be moved simply)
Click the OK button after checking.

Choose Save on the File menu and save a sculpt-map file.

Let's upload a sculpt-map file to the in-world.
When you upload a sculpt-map file, be sure to choose Upload Image on the File menu.
It costs 10L$ to upload one Sculpt-Map file.

And check by preview and check Use lossless compression.

Apply a sculpt map to an object and set a stitching type to Cylinder.

The texture used the Wood texture of the library in my inventory.
The setup is as follows.
You can check the part shown in yellow area not becoming wrinkles, but having a form which is easy to make a texture.

The boat was completed.

If you put in the script of a boat, you can make a prim boat one.
It will not be necessary to transform coordinates, because the sculpted prim of the coordinate system of the second life is made.
Original text: http://rokuro.slmame.com/c58153.html
This article is automatically translated by the computer interpreter.
Please notify me of any mistakes in translation.


