Let's make the following the main part of a soft serve ice cream by TATARA 7.0. 
To make this, I prepared the background image of the following soft serve ice cream. 
The light-blue area is symmetrical. The deep light-blue area is not symmetrical. TATARA changes the aspect rate of the background image automatically. When you make a background image, please remove a margin as much as possible.
Let's make a soft serve ice cream from the following steps.
1) Choose 32x32 of SPHERE by New of the File menu.
2) Make the symmetrical part (area of a light light blue and brown) of soft ice cream byROKURO mode.
3) Lock brown area by Bitmap mode.
4) Make a hollow in TOKOROTEN mode and unlock brown area.
5) Twist a symmetrical portion by ROKURO mode.
6) Make the tip (deep light-blue area) of soft ice cream by MAGE mode.
7) Make a texture for the soft serve ice cream.
8) Upload to in-world.
You can check this tutorial by following video.
Let’s make a Soft Serve Ice Cream.
Boot TATARA and choose New on the File menu. 
On the New dialog, choose 32x32 of SPHERE and click the OK button. 
Click the ROKURO tab and change edit mode into ROKURO. 
Choose Load Background on the View menu and select the following background image. 
Let's rearrange the control points of the deep light-blue area(non symmetrical part).
Rearrange the control points as follows. 
Choose the control points in the red area of the following figure. 
Choose Equal Intervals on the pop up menu for the edit pane by right-click. The shortcut of the keyboard is Ctrl+D. 
Let's edit the light-blue area twisted by the symmetry.
Rearrange control points, as shown in the following figure. 
Choose the control points in the red area of the following figure. 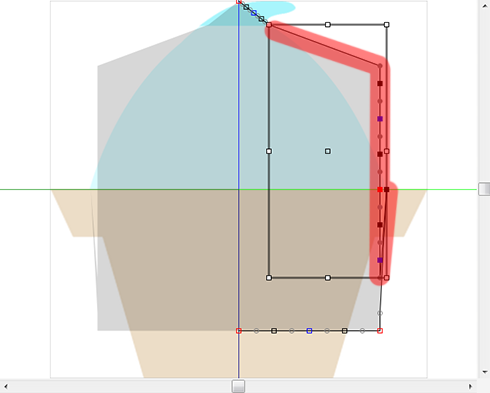
Choose Equal Intervals on the pop up menu for the edit pane by right-click. The shortcut of the keyboard is Ctrl+D. 
Change Edit Mode at the lower left of the edit pane into Worp. 
Let's move edit area.
Drag edit area, pressing the space key. 
As shown in the following figures, rearrange the round gray control points and square gray control points on the surroundings of the selection range. 
Click the O button at the lower left of the edit pane. 
Choose Equal Distance on the pop up menu for the edit pane by right-click. The shortcut of the keyboard is Shift+Ctrl+D. 
The edit pane is displayed as shown in the following figure. 
Let's restore the display position of edit area.
Right-click the Edit pane and choose Reset Position on the popup menu. 
In order to edit comfortably, change Edit Mode at the lower left of the Edit pane into Nomal, and change Edit Level into Middle. 
As follows, rearrange the control-points. 
As follows, rearrange the control-points. 
Let's lock the control-point of the area of the cup so that the shape of the cup may not change, even if it edits the cross section of the cream.
As follows, choose the control-point of the red area which gets the mark. 
Click the Bitmap tab and change the edit mode into Bitmap. 
As follows, choose all the control-points below the selected control. 
The preview pane is displayed as follows. 
Right-click the Edit pane and choose Lock. You can find Lock also on the Edit Menus. 
The preview pane is displayed as follows. 
Let's edit the level section on the TOKOROTEN mode.
Click the TOKOROTEN tab and change edit mode into TOKOROTEN. 
As shown in the following figure,click > button at the lower left of the edit pane, and choose the section 80. 
To make a slot simply, set Symmetry on the View menu as 4 Rotation. 
As shown in the following figures, If you rearrange two control points (red arrows), other six control points automatically. 
The preview pane is displayed as shown in the following figure. 
Let's unlock the locked of the area of the cup.
Right-click the Edit pane and choose Unlock All. 
Click the ROKURO tab and change to ROKURO mode. 
Let's check setup of the angle which you twist before twisting the object.
Choose Setup on the File menu. 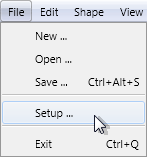
Check that Twist Degree is 60.
And Click the OK button and close the setup dialog. 
Choose the control points in the red area of the following figure. 
Choose Twist - Twist+ on the Edit menu, and twist the selected control points. 
If you choose Twist - Twist+ on the Edit menu twice, and you twist it 120 degrees in total.
The preview pane is displayed as shown in the following figure. 
Let's make the tip of the soft serve ice cream.
Click the MAGE tab and change to MAGE mode. 
Choose Load Background on the View menu and select the following background image. 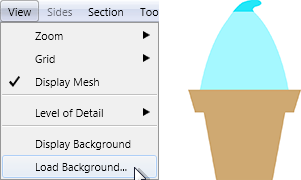
Expand the Edit area with the wheel of the mouse to be easy to edit.
When you turn the wheel of the mouse, the view area is expanded focusing on the cursor.
Arrange the control points as follows. 
Arrange the control points as follows. 
Arrange the control points as follows. 
Choose the control points in the red area of the following figure. 
Choose Equal Distance on the pop up menu for the edit pane by right-click. The shortcut of the keyboard is Shift+Ctrl+D. 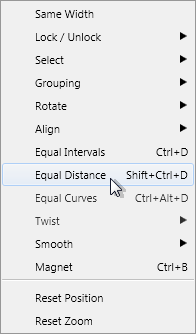
Rearrange the control points of five yellow area of following figure. 
The preview pane is displayed as shown in the following figure. 
Let's make the Textures of soft serve ice cream.
Let's use the Textures of the grille currently displayed by the preview.
Choose Save of the Texture Menus in the left end, and save the mesh Textures. 
Check the Number of the preview and create the following Textureses with the paint tool. 

Choose Load on the Texture Menu and load into the preview the textures created with the paint tool. 
To check the Textures, uncheck Display Mesh of the View Menus. 
The preview pane is displayed as follows. 
Let's check Setup before saving.
Choose Setup on the File menu. 
Set TGA Save Size as 64x64 in the displayed dialog.
And let's check the following items.
-Copy Protection by transparent When the prim is modified, you can make it transparent to prevent the texture from being copied by screen capture.
-Auto Maximize The object saved when you save your sculpt map file is maximized automatically. 
If you check Auto Rename, overwrite of a sculpt-map file is prevented.
Let's save your sculpt map file in TGA File form.
Choose Save on the File menu.

Choose TGA File of SaveDialog and save your file. 
Let's upload a sculpt-map file to the in-world.
When you upload a sculpt-map file, be sure to choose Upload Image.
It costs 10L$ to upload one Sculpt-Map file.
Choose Upload - Image (L$10) on the Build menu. 
Specify “Preview image as” as Sculpted Prim. And check it by the preview. Check Use lossless compression. And click Upload Button. 
Let's also upload the Textures. 
And apply the sculpt map uploaded to it.
Click the Object tab and set Building Block Type to Sculpted.

Apply your uploaded sculpt map. 
Apply your uploaded texture. 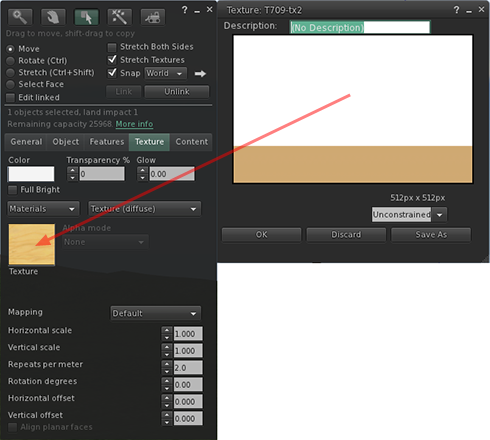
Please set the texture of it to white and stretch your object suitably. 
The soft serve ice cream was completed. 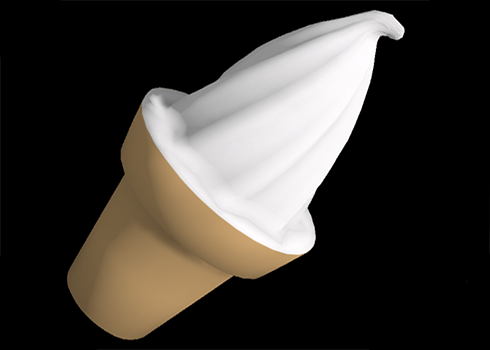
Original text: http://kanaenet.blogspot.jp/2013/08/t709-1.html
This article is automatically translated by the computer interpreter.
Please notify me of any mistakes in translation.


