Let's make the following Paper Bag by TATARA 7.0 and SOMATO 4.0. 
Let's make a paper bag from the following steps.
1) Choose 32x32 of SPHERE by New on the File menu.
2) Set a form to Fill Pillar.
3) Make a form in a bag on ROKURO mode.
4) Make the form where right and left were inserted in on TOKOROTEN mode.
5) Close order on TSUCHI mode.
6) Maximize and save.
7) Make a texture by graphic tool and SOMATO.
8) Upload the sculpt map file to the in-world.
You can check this tutorial by following video.
Boot TATARA and choose New on the File menu. 
On New dialog, choose 32x32 of SPHERE and click the OK button. 
Choose Fill Pillar without checking Crystallized on the Shape menu.
The preview pane is displayed as follows. 
Click ROKURO tab and change to ROKURO mode. 
Change into 20 from 40 the section by clicking < button at the lower left of the edit pane. 
To edit simply, change Edit Level at the lower left of an edit pane into Middle. 
The round gray control points displayed on the edit pane are rearranged automatically.
Let's use Grid, to make thickness of the paper bag uniform.
Set Grid on the View menu as one. 
Rearrange control points as follows. The thickness of the paper bag is 2 grids. 
Rearrange control points as follows. The thickness of the paper bag is 2 grids. 
Choose the three square control points shown in red area. 
Choose Equal Interval on the pop up menu by right-clicking the edit pane.
The Keyborad shortcut is Ctrl+D. 
The edit pane is displayed as follows. 
The preview pane is displayed as follows. 
Let's make the side of the paper bag.
Click a TOKOROTEN tab and change to TOKOROTEN mode. 
To edit only one section, click > button at the lower left of the edit pane, and choose the section 41. 
* You can edit nine sections from the section 00 to the section 40 at once on the section 40.
To edit only the section inserted in, choose Custom on the Sides menu and choose only the section to edit. 
Uncheck 00, 01, and C0-G0 of the dialog displayed, and click the Close button. 
Let's edit one side and copy to opposite by Mirror function.
Rearrange a control point as follows. 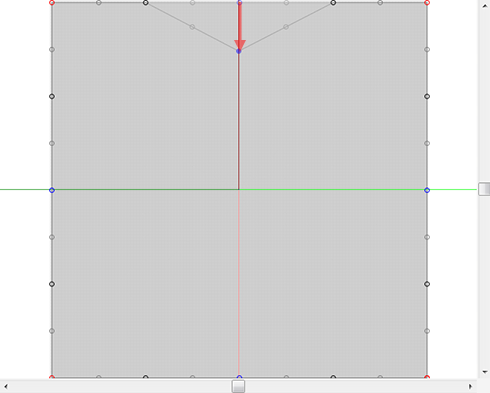
Choose the control point of the area of the following red marks. 
Choose Equal Interval on the pop up menu by right-clicking the edit pane.
The Keyborad shortcut is Ctrl+D. 
Adjust the size of the part selected as follows. 
Choose the control point of the area of the following red marks. 
Choose Equal Interval on the pop up menu by right-clicking the edit pane.
The Keyborad shortcut is Ctrl+D. 
The edit pane is displayed as follows. 
The preview pane is displayed as follows. 
Let's edit the bottom of the folded side.
Choose Select None on the Sides menu and edit only the section currently displayed on the edit pane. 
Let's edit the B1 section, 1st section from the bottom of the side of the paper bag.
Change into B1 from 41 the edited section by clicking > button at the lower left of an edit pane. 
The preview pane is displayed as follows. The orange line shows the section currently displayed. 
In order to edit the control points of a gray circle, set Edit Level at the lower left of an edit pane as Near. 
Choose seven control points shown in red area as follows. 
Choose Equal Interval on the pop up menu by right-clicking the edit pane.
The Keyborad shortcut is Ctrl+D. 
The edit pane is displayed as follows. 
Let's click < button at the lower left of an edit pane, and edit the section of B0. 
Choose five control points shown in red area as follows. 
Choose Equal Interval on the pop up menu by right-clicking the edit pane.
The Keyborad shortcut is Ctrl+D. 
The edit pane is displayed as follows. 
Let's click < button at the lower left of an edit pane, and edit the section of A1. 
Choose three control points shown in red area as follows. 
Choose Equal Interval on the pop up menu by right-clicking the edit pane.
The Keyborad shortcut is Ctrl+D. 
The edit pane is displayed as follows. 
The part of the triangle under the folded side was completed. The preview pane is displayed as follows. The area of the yellow triangle was edited. 
Let's copy from completed side to the opposite.
To make the edited side (yellow area) into a copied material as follows, it is necessary to shift arrangement of a control point. 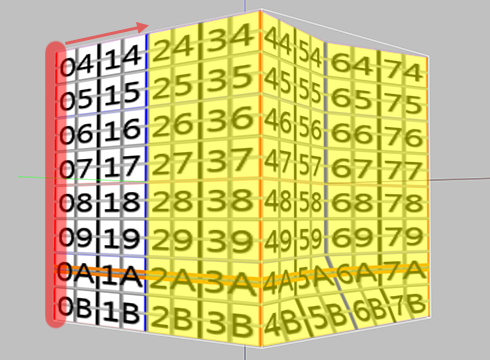
Choose Offset on the Edit menu. 
On the Offset dialog, set X: as -4 and click the OK button. 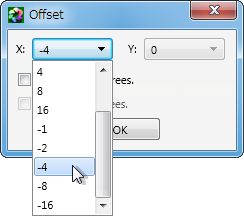
The preview pane is displayed as follows. The area shown in red is a specular surface. 
Choose "Mirror 80-GG from 00-7G" on the Edit menu. 
Click the YZ button on the Mirror dialog. 
*TATARA investigates the object and activates a suitable button.
One side was copied to the opposite.
The preview pane is displayed as follows. Yellow area is copied area. 
Let's close the upper part of the bag.
Click a TSUCHI tab and change into TSUCHI mode. 
To transform the side in a bag smoothly, set Grid on the View menu as None.

To change the display direction of the edit pane, click the YZ button at the lower left of an edit pane as follows. And uncheck Disp Edit Lines and Disp Only Surface. 
Choose all right halves (red area) as follows. 
As follows, drag the control point at the upper right of the edit range at a level with the left, pressing the Shift and Ctrl key. 
*The key arrangement was changed from TATARA 6.0.
Drag the control point at the upper right of the edit range to the upper right, pressing the Shift and Ctrl key once again. 
*The key arrangement was changed from TATARA 6.0.
The preview pane is displayed as follows. To copy the edited side (yellow area) to another side by a Mirror function, it is necessary to shift arrangement of the control points. 
Choose Offset on the Edit menu.
Set X: as 8 on the Offset dialog and click OK Button. 
Choose "Mirror 80-GG from 00-7G" on the Edit menu. 
Click the ZX button in the dialog displayed. 
*TATARA investigates the object and activates a suitable button.
To make it stronger LOD, Move the red line to the corner. 
Choose Offset on the Edit menu. 
Set X: as -4 on the Offset dialog and click OK Button. 
The preview pane is displayed as follows. 
Let's check Setup before saving.
Choose Setup on the File menu. 
Set TGA Save Size as 64x64 in the displayed dialog.
And let's check the following items.
-Copy Protection by transparent When a Prim is modified, you can make it transparent to prevent the texture from being copied by screen capture.
-Auto Maximize The object saved when you save a sculpt map file is maximized automatically. 
If you check Auto Rename, overwrite of a sculpt-map file is prevented.
Let's save the sculpt-map file by TGA File format.
Select Save on the File menu. 
Select TGA File of SaveDialog and save the file. 
Close TATARA.
Let's make a texture in the paper bag.
The preview of TATARA shows that textures are the following composition. 
In accordance with this, let's make the following texture by your graphic tools, such as GIMP or Photoshop. The size of the texture is 512x512. 
Let's add a shadow to this texture using SOMATO. SOMATO is a tool which makes the texture of the sculpted prim, avatar and mesh. You can check it more from http://kanae.net/secondlife/somato.html
Boot SOMATO. 
Set up the size of a texture by Size on the Texture menu, and set up the resolution of an object by Resolution on the Texture menu. Set Size as 512x512 and set Rezolition as 512. 
Choose Open Object on the File menu and load the sculpt map file of the paper bag which you made. 
Choose Open on the Texture menu. 
Set ZX to Layer in a Texture dialog, and click the OK button. 
Drag an object to the direction which applies light. And click the Light button. 
Click the Shadow button at the upper right of an operation pane. 
Set up Shade Value as follows.
Ambient 0.80
Diffuse 0.20
Speculear 0.00
Shading:Phong
Lighting:Phong-Blinn
Shadow: 0
AO Rate: 100
AO Rad: 50
AO Num: 50 
And click the Bake Shadow button. 
You can cancel the drawing texture while following dialog shows by clicking Cancel Button. 
The shadow was applied to the preview. 
Please adjust these to get the shadow with which you are satisfied.
Choose Save on the Texture menu and save your texture. 
On the Texture Save dialog, choose PNG file format and save it. 
The following textures were completed. 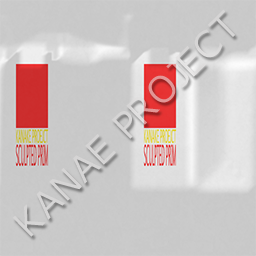
Let's upload your texture file and your sculpt-map file to the in-world.
It costs 10L$ to upload one texture file. Select Upload - Image (L$10) on the Build menu. 
Select the texture file, and upload after checking by preview. 
When you upload a sculpt-map file, be sure to choose Upload Image.
It costs 10L$ to upload one Sculpt-Map file. Select Upload - Image (L$10) on the Build menu. 
Specify “Preview image as” as Sculpted Prim. And check it by the preview. Check Use lossless compression. 
Let's apply the uploaded sculpt map and texture to the prim.
Click the Object tab. And set Building Block Type to Sculpted. And apply the sculpt map uploaded to it. 
Click the Texture tab. And apply the texture uploaded to the texture of the Texture tab. And check Full Bright. 
Modify the form of the cherry as follows. 
The paper bag was completed. 
Original text: http://kanaenet.blogspot.jp/2014/03/t728-1.html
This article is automatically translated by the computer interpreter.
Please notify me of any mistakes in translation.


