Let's make the five following leaves using TATARA 7.0 and SOMATO 4.0. 
All of the five leaves have the same form and texture.
To make this, I prepared the background image of the following leaf. 
Let's make the five leaves by the following steps.
1) Make the five disk in ROKURO mode.
2) Make the form of the leaf in TOKOROTEN mode.
3) Shift the position which the five leaves connect in TSUCHI mode.
4) Adjust the form of the leaf in TSUCHI mode.
5) Save temporarily. (Please don’t exit TATARA)
6) Make the texture by SOMATO using the saved sculpt map file and background image.
7) Load into TATARA the texture created by SOMATO.
8) Rearrange the five leaves in TSUCHI mode and Bitmap mode.
9) Upload the sculpt map file and the texture file to the in-world.
You can check this tutorial by following video.
Let's make the five leaves.
Boot TATARA and choose New on the File menu. 
On the New dialog, choose 32x32 of SPHERE and click the OK button. 
To edit easily, set Edit Level in the footing of the Edit pane as Middle. 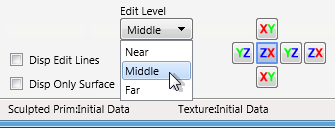
The round gray control points are rearranged automatically.
Click the ROKURO tab and change into ROKURO mode. 
Set Grid on the View menu as eight. 
As shown in the following figure, choose the control points of red area. 
Right-click the edit pane and choose Equal Intervals on the popup menu.
The shortcut of the keyboard is Ctrl+D. 
Let's make the five disks.
As shown in the following figure, rearrange the two control points. 
As shown in the following figure, rearrange the two control points. 
As shown in the following figure, rearrange the two control points. 
As shown in the following figure, rearrange the two control points. 
As shown in the following figure, rearrange the two control points. 
As shown in the following figure, rearrange the two control points. 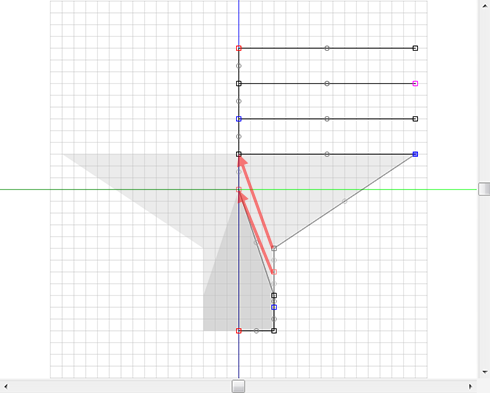
As shown in the following figure, rearrange the two control points. 
As shown in the following figure, rearrange the one control points. 
The preview pane is displayed as shown in the following figure. 
The five disks were made.
Let's make these disks into the form of the leaf in TOKOROTEN mode.
Choose the TOKOROTEN tab and change edit mode into TOKOROTEN. 
The edit by TOKOROTEN is reflected in other sections.
To edit one section, click > button at the lower left of the edit pane 6 times, and choose the section 70. 
Choose Load Background on the View menu and load the following background image. 
Set Grid on the View menu as None. 
As shown in the following figure, rearrange the nine control points of left side. 
As shown in the following figure, rearrange the seven control points of right side. 
Let's edit the form of the leaf on the TSUCHI mode.
Choose the TSUCHI tab and change edit mode into TSUCHI. 
As shown in the following figures, click the XY button in the lower-left of the edit pane. Uncheck Disp Edit Lines and Disp Only Surface. 
Choose Load Background on the View menu and load the following background image. 
You notice that the direction of the leaf is different. It is because the direction to the display is different in TOKOROTEN mode and TSUCHI mode.
Let's make rotation of the leaves easy.
Choose Setup on the File menu. 
Set Shift Rotate Deg. as 15 and click the OK button. 
As shown in the following figure, choose all the control points. 
As shown in the following figure, drag the upper left of the choice control point and rotate pressing the Shift key the leaf the 90 degrees counterclockwise. When the SHIFT key is pressed after starting to drag, it will rotate by increment the 15 degrees. 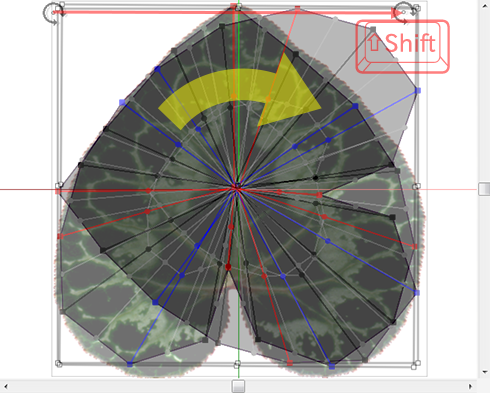
Drag and move the control point chosen as shown in the following figures, and make them fit the background image. 
Concentration, then the texture of the control point are not beautifully drawn on the center of the leaf. Let's rearrange the central control point so that it may not be remarkable.
As shown in the following figure, choose the control point in red area not by the click but by range selection. It is for having overlapped and also choosing the control point on the background of the leaf and the control point of other four leaves which are not visible. 
Drag the control point like the red directional arrow of the following figure. 
To rearrange the control point of the gray circle, set Edit Level at the lower left of the edit pane as Near. 
Rearrange the control point of the yellow area of the following figure.
To edit all five leaves at once, choose the control point of the gray circle by range selection. 
The form of the leaf was completed.
Let's save this sculpt map file temporarily.
Check setup by Setup on the File menu before saving the file. 
To make the texture from SOMATO using the background image, you have to save without maximizing the form edited by TATARA.
ですから,Therefore, uncheck Auto Maximize and click the OK button. 
Choose Save on the File menu and save the sculpt map file. 
Save by the TGA file format. 
Please don’t exit TATARA.
Let's make the texture using the sculpt map and background image which were saved by SOMATO.
Boot SOMATO. 
And load the sculpt map file which chose and saved Open Object on the File menu. 
The preview pane of SOMATO is displayed as shown in the following figure. 
Select 512x512 of the Size on the Texture menu and you can select the size of texture which will be made by SOMATO. 
Select the 512 of the Resosution on the Texture menu and you can select baking resolution. 
Click the XY button, as shown in the following figure. 
Choose Open on the Source menu and load the following background image. 
Then, the edit pane is displayed as shown in the following figure. You notice similarly displayed as the edit pane of TATARA. If you want to adjust the position of the texture, drag the control point of the area where the following figures are red and it is round, or edit the digit value of the red area at the lower right of the edit pane. 
Let’s set the property of texture.
Select the Property on the Texture menu. 
Set Vertical Scale as 5.3333 and set Vertical Offset as 0.840. 
Check the X-ray radio button. 
Click the Bake button and create the texture. 
Creation of the texture will display the preview pane, as shown in the following figure. 
Choose Save on the Texture menu and save the created texture. 
You get the following texture. 
Exit SOMATO.
Let's load into TATARA the texture saved by SOMATO, and adjust disposition of the leaves.
Choose Load on the Texture menu of TATARA and load the texture file created by SOMATO. 
Let’s set the property of texture.
Select the Property on the Texture menu. 
Set Vertical Scale as 5.3333 and set Vertical Offset as 0.840. 
The preview pane is displayed as shown in the following figure. 
The background image is unnecessary. Choose Disp Background on the View menu and set the background image to invisible. 
Let's change the five leaves into the suitable size.
As shown in the following figure, choose all the control points. 
Drag the control point at the upper left of range selection, and make the leaves small. 
As shown in the following figures, drag the leaf from which the root of the leaf was chosen in the center. 
Let's give modification to the five leaves.
Click the YZ button at the lower left of the edit pane. 
Set Edit Mode at the lower left of the edit pane as Worp. 
Choose the red area of the following figure. 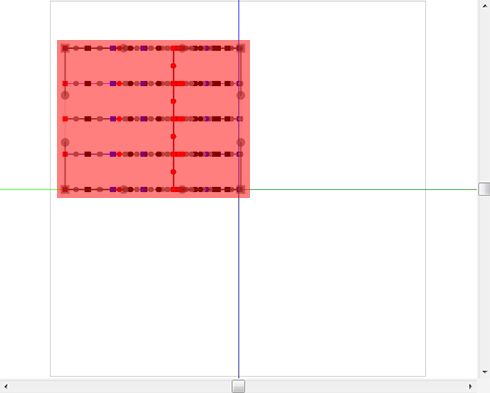
As shown in the following figures, drag the four gray control points. 
Click the O button at the lower left of the edit pane. 
Set Edit Mode at the lower left of the edit pane as Normal. 
Let's rearrange the five leaves.
Click the XY button at the lower left of the edit pane. 
Let's change the setup, to rotate the simply selected control point.
Choose Setup on the File menu. 
Set Shift Rotate Deg. as 72 and click the OK button. 
Click the Bitmap tab and change into Bitmap mode. 
As shown in the following figure, choose the row 30-50, and click the TSUCHI tab. 
Drag the central control point of rotation in the center of gravity of the choice range in the center. 
As shown in the following figure, drag the neighborhood of the control point at the upper right of the choice range, and rotate the selected leaf. When the SHIFT key is pressed after starting to drag, it will rotate by increment the 72 degrees. 
Let's choose the control points on Bitmap mode and rearrange the remaining leaves on TSUCHI mode.
Click the Bitmap tab and change into Bitmap mode. 
As shown in the following figure, choose the row 60-80, and click the TSUCHI tab. 
Drag the central control point of rotation in the center of gravity of the choice range in the center. 
As shown in the following figure, drag the neighborhood of the control point at the upper right of the choice range, and rotate the selected leaf. When the SHIFT key is pressed after starting to drag, it will rotate by increment the 72 degrees. 
Click the Bitmap tab and change into Bitmap mode. 
As shown in the following figure, choose the row 90-B0, and click the TSUCHI tab. 
Drag the central control point of rotation in the center of gravity of the choice range in the center. 
As shown in the following figure, drag the neighborhood of the control point at the upper right of the choice range, and rotate the selected leaf. When the SHIFT key is pressed after starting to drag, it will rotate by increment the 72 degrees. 
Click the Bitmap tab and change into Bitmap mode. 
As shown in the following figure, choose the row C0-E0, and click the TSUCHI tab. 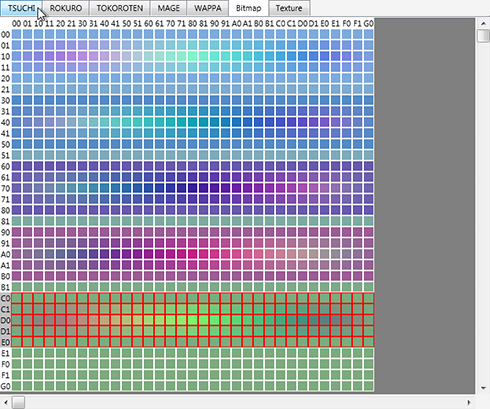
Drag the central control point of rotation in the center of gravity of the choice range in the center. 
As shown in the following figure, drag the neighborhood of the control point at the upper right of the choice range, and rotate the selected leaf. When the SHIFT key is pressed after starting to drag, it will rotate by increment the 72 degrees. 
The preview is displayed as shown in the following figure. 
Let's upload a sculpt-map file to the in-world.
Let's check Setup before saving.
Select Setup on the File menu. 
Set TGA Save Size as 64x64 in the displayed dialog.
And let's check the following items.
-Copy Protection by transparent When the prim is modified, you can make it transparent to prevent the texture from being copied by screen capture.
-Auto Maximize The object saved when you save your sculpt map file is maximized automatically. 
If you check Auto Rename, overwrite of a sculpt-map file is prevented.
Let's save your sculpt map file in TGA File form.
Select Save on the File menu. 
Select TGA File of Save Dialog and save your file. 
Let’s upload texture file. It costs 10L$ to upload one texture file.
Let's upload a sculpt-map file to the in-world.
Select Upload - Image (L$10) on the Build menu. 
Specify “Preview image as” as Sculpted Prim. And check it by the preview. Check Use lossless compression. And click Upload Button. 
Select Upload - Image (L$10) on the Build menu. 
Select the texture file, and click Upload button after checking by preview. 
Let's apply the sculpt map.
Build the objelct. And click the Object tab and set Building Block Type to Sculpted on Edit floater. 
Apply your uploaded sculpt map. 
Click the Texture tab. And apply the texture uploaded to the texture of the Texture tab. And Set Vertical Scale as 5.3333 and set Vertical Offset as 0.840. 
Stretch your object suitably. 
The five leaves was completed. 
Original text: http://kanaenet.blogspot.jp/2014/03/t729-1.html
This article is automatically translated by the computer interpreter.
Please notify me of any mistakes in translation.


